How to Connect Outlook to Your AI Assistant
Set up Outlook Assistant so your AI assistant can read and manage your email, calendar, and contacts.
Connect your Microsoft 365 or Outlook.com account so your AI assistant can search emails, manage your calendar, and work with contacts on your behalf.
Install Outlook Assistant
Install the package globally:
npm install -g @littlebearapps/outlook-assistantOr clone and install locally:
git clone https://github.com/littlebearapps/outlook-assistant.git
cd outlook-assistant
npm install
Register an Azure App
Outlook Assistant needs an Azure app registration to access the Microsoft Graph API. This is free and takes about 10 minutes.
Follow the full walkthrough in the Azure Setup Guide, or the short version:
- Go to Azure Portal → App registrations
- Click New registration
- Set the redirect URI to
http://localhost:3333/auth/callback(platform: Web) - Under Certificates & secrets, create a new client secret — copy the Value (not the Secret ID)
- Under API permissions, add these Microsoft Graph delegated permissions:
offline_access— refresh tokens between sessionsUser.Read— basic profileMail.Read,Mail.ReadWrite,Mail.Send— email operationsCalendars.Read,Calendars.ReadWrite— calendar operationsContacts.Read,Contacts.ReadWrite— contact managementMailboxSettings.ReadWrite— settings, categories, auto-repliesPeople.Read— people search
Optional (work/school accounts only):
Mail.Read.Shared— shared mailbox accessPlace.Read.All— meeting room search (requires admin consent)
Common mistake: Copy the secret Value, not the Secret ID. Using the wrong one causes
AADSTS7000215errors.
Add to Your AI Tool
Claude Desktop
Add to your claude_desktop_config.json:
{
  "mcpServers": {
    "outlook": {
      "command": "npx",
      "args": ["-y", "@littlebearapps/outlook-assistant"],
      "env": {
        "OUTLOOK_CLIENT_ID": "your-client-id",
        "OUTLOOK_CLIENT_SECRET": "your-secret-value"
      }
    }
  }
}
Claude Code
Add to your .mcp.json or project settings:
{
  "mcpServers": {
    "outlook": {
      "command": "npx",
      "args": ["-y", "@littlebearapps/outlook-assistant"],
      "env": {
        "OUTLOOK_CLIENT_ID": "your-client-id",
        "OUTLOOK_CLIENT_SECRET": "your-secret-value"
      }
    }
  }
}
Other MCP Clients
Any MCP-compatible client can use Outlook Assistant. Set the command to npx -y @littlebearapps/outlook-assistant and pass the two environment variables.
Understanding the Two Processes
Outlook Assistant has two separate processes that serve different purposes:
| Process | Purpose | When to run | How it runs |
|---|---|---|---|
MCP server (index.js) | Handles all 20 Outlook tools — searching emails, reading calendar, etc. | Always (runs automatically) | Your MCP client starts it from your MCP config |
Auth server (outlook-auth-server.js) | Handles OAuth login — the one-time browser authentication flow | Only during initial setup or re-authentication | You start it manually with npx @littlebearapps/outlook-assistant auth-server |
Key points:
- The MCP server is what your AI assistant talks to. It starts automatically when your MCP client launches.
- The auth server is a temporary helper that runs on port 3333 to receive the OAuth callback from Microsoft. You only need it when authenticating or re-authenticating.
- After authentication succeeds, you can stop the auth server. The MCP server handles token refresh on its own.
- Both processes need
OUTLOOK_CLIENT_IDandOUTLOOK_CLIENT_SECRET. The MCP config"env"block provides these to the MCP server automatically. For the auth server, you need to either set them as shell environment variables or have a.envfile in the project root.
Authenticate for the First Time
- Start the OAuth server:
npx @littlebearapps/outlook-assistant auth-serverThe auth server needs
OUTLOOK_CLIENT_IDandOUTLOOK_CLIENT_SECRETenvironment variables. These are not automatically inherited from your MCP client’s config — that config only applies to the MCP server process. Either:
- Create a
.envfile in the project root (copy from.env.example), or- Export the variables in your shell before running the command
- Ask your AI assistant to authenticate:
“Connect to my Outlook account”
Your AI assistant will call the auth tool with action: authenticate and return a URL.
- Open the URL in your browser, sign in with your Microsoft account, and grant permissions.

- After granting access, the browser redirects to
localhost:3333and tokens are saved automatically to~/.outlook-assistant-tokens.json.
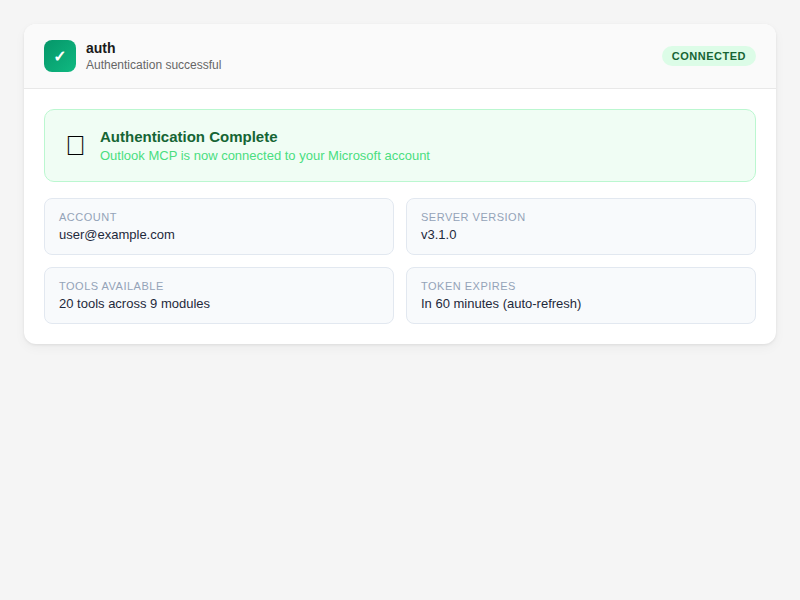
Verify It’s Working
Ask your AI assistant:
“Check my Outlook connection status”
The auth tool is called with action: status. You should see your email address and token expiry time.
Then try a simple read:
“Show me my last 5 emails”
If you see your recent emails, everything is connected.
Troubleshooting
| Problem | Solution |
|---|---|
AADSTS7000215 (invalid secret) | Use the secret Value, not the Secret ID |
EADDRINUSE :3333 | Run npx kill-port 3333 then restart the auth server |
| Auth URL doesn’t open | Start the auth server first with npx @littlebearapps/outlook-assistant auth-server |
| Permissions error after login | Check API permissions in Azure Portal and grant admin consent if required |
| Token file not found | Tokens are stored at ~/.outlook-assistant-tokens.json — check the file exists after auth |
Related
- Azure Setup Guide — full Azure walkthrough with screenshots
- Verify Your Connection — check auth status and re-authenticate
- Find Emails — your first search after connecting
- Tools Reference — all 20 tools with parameters